Frameless Glass Balustrades - Domestic and Commercial Glass Channel System
In the home, frameless glass looks amazing on staircase design projects but it will also provide a wow factor when used in hallways, landings and for balcony balustrading. Outside, our frameless glass balustrades give you amazing, uninterrupted balcony or terrace views.
Seagull can design and produces two types of frameless glass balustrades - semi-frameless and fully frameless;
- Fully Frameless Glass Balustrade. The fully frameless balustrade offers 100% uninterrupted views as it uses toughened and laminated glass and does not have a handrail on top.
- Semi Frameless Glass Balustrade. The semi-frameless option sees the addition of a stylish round handrail on top of toughened glass. Ideal for glass staircase designs.
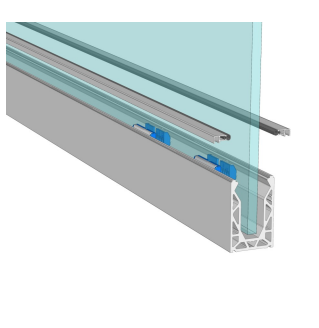
Our frameless glass balcony and handrail systems use an innovative aluminium channel system to hold the glass panels. You can incorporate clear, patterned, tinted, frosted or sandblasted glass in any of the above glass balustrade systems.
The system can accommodate a range of different glass sizes; 12mm, 15mm, 17.5mm, 19mm and 21.5mm. There are no limitations of lengths or sizes.
Easy install
The Frameless Balustrade system is easy to install. We cut the glass cut to order so no drilling is required. Click the 'Product Info' tab to take a look at the video to see how the system works. And click on the 'Assembly' tab below for our step-by-step installation guide.
Send us your Enquiry now.
Whether you're looking for a frameless glass balcony balustrade systems or a semi-frameless handrail balustrade design, they are all made-to-order. Use the enquiry form opposite to provide us with a few details and we’ll call or email you with a no obligation quotation and any additional details you require.
- Product info
- Offers seamless views
- Framless balustrades suitable for internal and external applications
- Designed to be installed without the need of ensuring the fitting surface is totally level
- Fully adjustable: channel uses an adjustment system allowing horizontal alignment of each glass panel
- Semi-frameless glass balustrades include an optional stainless steel top handrail
- Glass panels are toughened and laminated for maximum strength and safety
- Designed to meet all UK building regulations
- Various glass thicknesses and types available
Take a look at the video below which shows how our balustrade system works.
- Specification
Sizes
- Our frameless glass balustrades and glass staircase designs are made to order so sizes can be customised
Glass
- 12 - 21.5mm thick, toughened and laminated
- Base channel mounted
Precision machined
- 42.4mm / 48.3mm / 50.8mm Stainless Steel
- 304/316 AISI Satin finish/ Mirror finish (brushed)
- Assembly
We have tried to make the system as simple and easy to install as possible, however should you not feel confident enough to fit this please contact a reputable glazier or builder.
Should any problems arise please don’t hesitate to contact us.
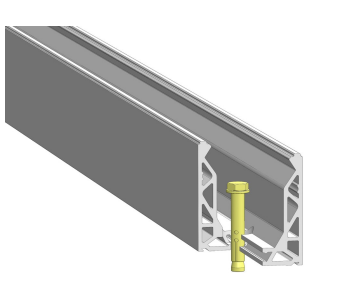
Step 1: Install Base Rail
The aluminium base rail should be placed onto its designated position and the holes marked onto the substrate for drilling. The Channel should then be levelled and lined up with the use of shims. Once the shoe is plumb and level, the fixings should be tightened up to make the channel rigid.
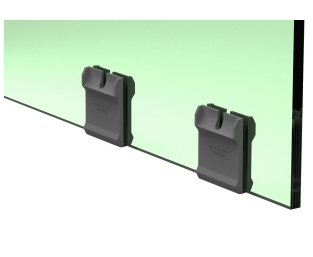
Step 2. Fit the glass slip clamps
The glass slip clamps need to be placed on the bottom of the glass. This requires lifting the glass off the floor sufficiently or turning the glass upside down to squeeze these on. The slip clamps require spacing so that four are used per metre. The clamps placed on either end of the glass should be located 100mm in from the edge of the glass and then 250mm to the next clamp. The glass can now be placed into the channel.
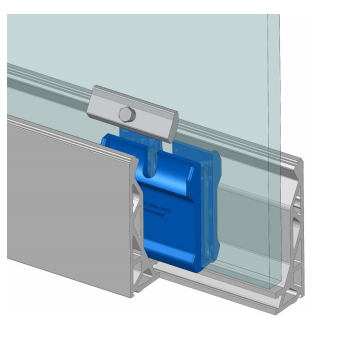
3. Fit the Glass Clamp Bar
Once the glass is fitted in place, you now need to place the clamp bars into the top of each glass slip clamp. First you must screw the bolt into the clamp bar until the head of the bolt just reaches the bar. The shaped side of the bar will sit nearest to the glass.
You can now sit each clamp bar into the glass slip clamps.
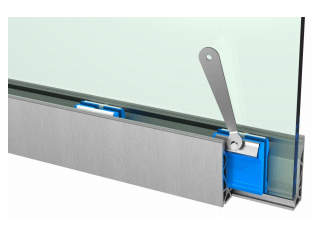
4. Ensure the glass is plumb and tighten bolts
You now need to place a spirit level on the glass to get the glass in the correct position. The bolts now need tightening into the channel equally to keep the same pressures on the glass. To adjust the glass into position you must unscrew the bolts back onto the channel.
To achieve the correct positioning firstly square up and level each end of the glass and tighten. Then tighten the intermediate clamp bars.
Once the bolts have pinched they now need a half turn to securely hold the glass in place.
5. Fit the top seal strip
The gasket requires feeding into the smaller profile supplied, you must not stretch the gasket. Once the gasket is flush with each end of the strip it now needs to be clipped onto the top of the channel, this can be done by pressing firmly down on the profile. Working from one end to the other is recommended.
Once you are happy everything is in place and the job is complete you need to clean the glass and channel. We recommend the use of any standard glass cleaner so long as it is not abrasive. We also recommend a soft sponge or cloth, again to avoid any risk of scratching.
- Delivery & Returns
We send out all orders on a next day carrier service and most products arrive between 7 – 10 days from the date your order was submitted. Larger orders are delivered by our own transport.
If your order is damaged, please notify us at your earliest possible convenience and we will arrange either to re-work your order or replace it. In the unlikely event that your system does not arrive at all we must be advised in writing within 7 days of the advised despatch date.